|
 Get
Good Powder Get
Good Powder
Sifting your henna
Ingredients
Recipe
The adherence of Henna
Would you believe that no
set formula exists for making mehndi paste? Each artist has his or her own
personal preferences, and in the same way you can use basic ingredients, in various combinations, to create
a unique recipe. Use this page for *guidelines* on mehndi paste preparation.
I offer different alternatives for mixing mehndi, but the ingredients and methods
available to you may be more or less complex than what I offer here.
If you would like to see the
new wave in henna
preparations, visit Catherine Cartwright Jones's site, http://sphosting.com/reverndbunny/siriusmiracle.html,
which describes new ingredients (including various essential oils such as
cajeput, geranium, and tea tree oil) as well as new time frames for you to
get the best henna design possible. In my own recipe, I'll explain how I
incorporate essential oils.
 Step
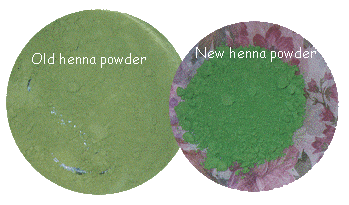
1 to a good henna paste: you *must* have good henna powder to work with.
The picture to the right exemplifies my original attitude toward quality
henna powders, that old powder is dull in color and that new powder is
brighter. However, I'm posting new information here (9/18/2002), which I
learned during my most recent trip to India. Step
1 to a good henna paste: you *must* have good henna powder to work with.
The picture to the right exemplifies my original attitude toward quality
henna powders, that old powder is dull in color and that new powder is
brighter. However, I'm posting new information here (9/18/2002), which I
learned during my most recent trip to India.
New henna powder generally appears
green, while
old henna is much more muted and may appear slightly brown. BUT .
. Because of this tendency, many suppliers, particularly henna
suppliers in India, have started to add green dyes to make henna powder
look very green (see the "new henna powder" picture above), but
the stain produced may not differ from duller powders. Additionally,
according to street henna suppliers as well as Usha and Ekta Shah, mehndi
artists in Mumbai, some companies add other leaf powders, colored sand,
and twigs to henna, thus decreasing costs and, simultaneously, decreasing
the quality of henna produced. Many commercially packaged powders may be
labeled 100% natural henna, but in reality they may be only 20%-40% henna.
Thus, remember: There is no way to tell the quality of a henna powder
by its color. So here are my tips in selecting powders:
-
Read as many websites as you can to see
which suppliers artists tend to use. I have many links to artists and
henna suppliers on my website. Use these resources and visit www.hennapage.com.
-
Get a small
amount of henna powder (100 grams or so) before committing to a larger
quantity from a supplier. Ask for samples if possible.
-
Avoid buying henna
from grocers because you never know how long these powders have sat on
the shelf. The $1 or so price tag may attract you, but you risk
buying very low quality henna.
-
Avoid black hennas and
"herbal" hennas. Do not use hennas that are intended for
hair.
-
You
will know good mehndi powder when you use it.
First, it will have a very stringy texture when you mix it, even in plain
water. As an earmark try lifting a spoon of paste; it should come
off the spoon smoothly and in a thin string, like molasses or honey.
Good henna also tends not to stick to the sides of your mixing
container. It is viscous and smooth.
-
Good henna will stain your skin a light orange within minutes of
application.
-
Good powder is also fresh powder; to maintain the freshness
of your henna, store it in a sealed container in the frig or freezer, with
minimal exposure to air. Henna works optimally for a uear after
purchase, but will still stain adequately for a few years after as
well.
Step 2 to good
henna paste: Make sure that your henna is filtered well. It should not
contain any twigs or fibers, which commonly appear in coarser grades of
henna that are intended for the hair.  f you click
on the image to the left, you will see that this powder exemplifies the
residual fibers you obtain after sifting out the larger grains. Sifting
henna is a tedious process, so I recommend that you try to buy sifted
varieties of henna. Nevertheless, even if you buy your powder pre-filtered
(find the "triple-sifted variety), strain it just in case and see
what twigs you find; you may be surprised to see how much smoother paste
will be the more times you strain your henna. Above you can see pictures
of my filtering devices, which can be nylon cloth fixed to a sewing hoop,
an industrial-grade sieve, a tea strainer (I only recommend this for
getting lumps out of henna, though), or a nylon stocking stretched over a
mixing bowl. If you choose not to sift your powder before mixing,
straining it through a nylon stocking will give you the same effects that
sifting would, in addition to removing any lumps you attain in paste. f you click
on the image to the left, you will see that this powder exemplifies the
residual fibers you obtain after sifting out the larger grains. Sifting
henna is a tedious process, so I recommend that you try to buy sifted
varieties of henna. Nevertheless, even if you buy your powder pre-filtered
(find the "triple-sifted variety), strain it just in case and see
what twigs you find; you may be surprised to see how much smoother paste
will be the more times you strain your henna. Above you can see pictures
of my filtering devices, which can be nylon cloth fixed to a sewing hoop,
an industrial-grade sieve, a tea strainer (I only recommend this for
getting lumps out of henna, though), or a nylon stocking stretched over a
mixing bowl. If you choose not to sift your powder before mixing,
straining it through a nylon stocking will give you the same effects that
sifting would, in addition to removing any lumps you attain in paste.
The quality of
your henna, as I have said above, is paramount to the quality of your mehndi. You may notice that the color will be of the
same quality and last the same duration that your specially mixed mehndi was.
Nevertheless, adding ingredients like lemon, eucalyptus oil, a sugary substance, and tea,
can improve the usability and staining ability of your mehndi, in addition
to adding a host of wonderfully sweet nice
smells to accompany your design.
Ingredient List (I use the ingredients highlighted with an asterisk)
Main Ingredients
-
*Lemon or Lime Juice -
Henna only releases its dye at a low pH, so adding something acidic to
your henna will help to improve and catalyze the dye-release process.
Lemonade concentrate is an appropriate form of this ingredient as
well.
-
*Essential Oil -
The most commonly used essential oil in henna art is eucalyptus oil.
Often henna companies sell "mehandi" oils or "nilgiri"
oils, which are combinations of various essential oils. These days,
artists look for individual oils with high terpene content; such as
tea tree oil, cajeput oil, or terpeneol. Artists balance out the
strong scents of these oils with milder floral oils. Be careful when
using essential oils; they may irritate the skin. When used liberally,
oils can help your henna dye to near-black stains, but they will also
make a dent in your wallet; they're very expensive. Also, using more
essential oils will shorten the life of both your henna paste and your
eventual stain.
Other Ingredients
-
Tea (or Coffee)- not necessary, but gives a nice smell and helps to give an
initially darker
stain. Artists experiment with various "henna brews," to
which they add a variety of extra ingredients such as methys seeds,
tamarind paste, dried limes, etc.
-
*Sugar, sugar syrup -
Sugar increases your paste's ability to absorb moisture because of its
water absorptive properties. It will prevent your paste from drying too early. People also use sugar (glycerine as well) to increase paste
stickiness
-
*Tamarind Paste (Tamarindo,
Tamicon brands). You can boil tamarind paste in your tea or add it
straight to paste to improve paste stickiness, acidity, and viscosity
(stringiness).
-
Fenugreek seeds (Known
as Methi ka dana in India). Boil these seeds in your tea
concoction and strain them out before adding to you henna; they give henna a more stringy
consistency. Boiled Okra juice creates the same effect.
-
Yogurt or Egg -
traditionally used in hair henna, you can experiment with these in
your skin henna as well.
-
Cloves - Cloves are
mordants, similar to the oils that you can use on your skin. Artists
often boil cloves in their tea brews, but watch out; you may find
clove-spiked henna to be a skin irritant.
-
Titanium powder -
makes paste smoother
-
Wine/wine vinegar -
properties analogous to lemon juice
-
Iced tea - properties
analogous to tea, sugar and lemon
Recipe
 Here is a general
mehndi recipe which can afford many different variations: For one mehndi cone, which
can cover two hands fully, I take 1 heaping teaspoonful of mehndi powder
in a stainless steel container (although some people suggest a plastic,
glass, or ceramic container), add a 1/2 teaspoon of sugar, a 1/2 teaspoon
of tamarind paste, and as much lemon juice as I need, blending thoroughly.
After getting out all of the lumps, I allow the paste to sit overnight,
covered tightly (get out all air bubbles). Here is a general
mehndi recipe which can afford many different variations: For one mehndi cone, which
can cover two hands fully, I take 1 heaping teaspoonful of mehndi powder
in a stainless steel container (although some people suggest a plastic,
glass, or ceramic container), add a 1/2 teaspoon of sugar, a 1/2 teaspoon
of tamarind paste, and as much lemon juice as I need, blending thoroughly.
After getting out all of the lumps, I allow the paste to sit overnight,
covered tightly (get out all air bubbles).
The next
morning, I add a half-teaspoon of essential oil (I use both tea tree and
eucalyptus) to my henna, and mix thoroughly. Next, I cover the container
and allow at least five hours to pass. You'll know that the dye has
released when the top part of the henna is brown and brown liquid is
seeping out of the paste.
The trick to making the
paste is that you have to add the right amount of liquid such that the mehndi is neither too
thick nor too thin. Generally, mix a 3:2 proportion of liquid to powder. A
way to judge whether you have the right consistency for the paste is to take a spoonful of
the mehndi paste, hold it over your container, seeing if the mehndi falls back gently back into the container. If it falls in
a bit 'goopily,' the mehndi of the right consistency. Really good henna will
fall in "strings."
Having a paste of the correct viscosity for your
application method is essential. Stringy and fine mehndi paste will
allow you to create fine lines. Make sure that you keep extra liquid and extra
mehndi powder to correct for any mistakes. Essentially, making mehndi paste
takes practice in trail and error. Whatever you do, always be sure to remove any and all
lumps from your henna paste; mixing the paste thoroughly is a crucial step to having a
good quality and easy to use paste.
Another great
recipe
My aunt suggested to me
a recipe I used to use at home, which she had learned from masters in mehndi from India. Basically, take water,
tea leaves (I used 2 lipton tea bags), a few seeds of methi ka dana, and some tamarind
paste, and boil this mixture until it reduces to half its original volume. Strain
the tea (to get rid of the grains of methi and tamarind) and allow it to cool
completely. Then add the henna and eucalyptus oil that you need (the general ratio
is 1:1 liquid to solid). I usually add about 1/8 teaspoon sugar as well. Blend the paste
completely, and allow it to sit, covered, for at least two hours. The premise behind
waiting for the tea to cool is, that if you add hot tea to the henna, the henna will cook
somewhat and therefore will become more grainy and more difficult to use. Allowing
the henna to sit for 2 hours or better yet, overnight, will help
the powder to dissolve better into the liquid.
 The
person who recommended to me to use iced tea said, "I have been experimenting with
mehndi & discovered I had better results with a powdered instant ice tea mix than with
regular tea bags. The mix has sugar and lemon juice powder, and I mixed about twice
as much mix as mehndi powder, or just until you get a really dark color. It tends to
make the mehndi paste adhere better, and tend to stay creamier, and wet
longer." I haven't experimented with the iced tea myself, but it sounds
like the idea could work considering the ingredients in the powdered mix. This
person also suggested the wine vinegar. She once saw a recipe calling for wine and
decided to replace it as such. She said that she got a very nice color, but the
henna also fell off the skin very quickly. The
person who recommended to me to use iced tea said, "I have been experimenting with
mehndi & discovered I had better results with a powdered instant ice tea mix than with
regular tea bags. The mix has sugar and lemon juice powder, and I mixed about twice
as much mix as mehndi powder, or just until you get a really dark color. It tends to
make the mehndi paste adhere better, and tend to stay creamier, and wet
longer." I haven't experimented with the iced tea myself, but it sounds
like the idea could work considering the ingredients in the powdered mix. This
person also suggested the wine vinegar. She once saw a recipe calling for wine and
decided to replace it as such. She said that she got a very nice color, but the
henna also fell off the skin very quickly.
Adherence
A key to henna
that sticks to your skin is adding sugar or some sticky substance to it. In my
most recent henna uses, the paste has stuck to my skin like glue simply
because I added a little sugar to the paste. Believe me, a tad of sugar
goes a long way - not only to make the paste more sticky, but to increase
the water absorbance of the henna.
I have also discovered that the more
thinly you apply mehndi, the better it adheres to the skin (places like blackened
fingertips or thick lines tend to have mehndi fall off more quickly). Also, applying
lemon-sugar solution with a good proportion of sugar increases the henna's
adherence. As far as getting nearly-black mehndi goes, I think that I have
discovered that time is an increasingly important factor in the ability for henna to
stain. While I usually keep henna on for about 45 minutes to 2 hours, getting a dark
brown as a final color, I notice that the blacks really don't occur until you keep henna
on for over 3 hours, preferably for 4-6 hours. Some people recommend
keeping henna on overnight, though I haven't noticed huge differences
recently in a three-hour application versus overnight. If you do keep
mehndi overnight, just make sure to cover it and make sure that the henna is relatively
dry before you go to sleep. Otherwise, it will smush and get yucky. (places like blackened
fingertips or thick lines tend to have mehndi fall off more quickly). Also, applying
lemon-sugar solution with a good proportion of sugar increases the henna's
adherence. As far as getting nearly-black mehndi goes, I think that I have
discovered that time is an increasingly important factor in the ability for henna to
stain. While I usually keep henna on for about 45 minutes to 2 hours, getting a dark
brown as a final color, I notice that the blacks really don't occur until you keep henna
on for over 3 hours, preferably for 4-6 hours. Some people recommend
keeping henna on overnight, though I haven't noticed huge differences
recently in a three-hour application versus overnight. If you do keep
mehndi overnight, just make sure to cover it and make sure that the henna is relatively
dry before you go to sleep. Otherwise, it will smush and get yucky.
Go Forward to "How do you apply
mehndi paste?"
Home Page
| Mehndi Home | Mehndi Artist Locations
Henna Supplier Listings | Mehndi Links |
Art Gallery | Sample Designs
Sign my Guestbook | View New Guestbook
Guestbook Archives: 1 | 2
About Me | Awards | Purchase Mehndi Books | E-mail me
Updated September 18, 2002 by Rupal Pinto
Photographs by Rupal Pinto, pictured are a foot
design, 1997; Back design, 1998.
Unless otherwise indicated, all text and images
Copyright © Rupal Pinto 1997-2002. All Rights Reserved.
|
|
